

By Dan Moren
November 28, 2022 9:00 AM PT
Creating a smart On Air sign with an e-ink display
Note: This story has not been updated since 2022.

Ever since I moved into my new house a year ago, I’ve been looking for a fun way to designate when I’m recording a podcast. Yes, I could just close the door to my office—but sometimes when I do, I’m just working on something where I don’t mind being interrupted. I could also use a low-tech method like a door hanger, but then it’s one additional piece of cognitive overhead to remember to put it out when I’m recording.
No, if ever a problem cried out for a ridiculously over-engineered solution, this was clearly it.
At first I considered something simple, like a red smart bulb I could put up next to my office door. But it’s in a small hallway, and there are no electrical outlets nearby. Which meant that whatever solution I came up with had to be battery-powered and, ideally, last a long time. Likewise, there’s no place for a table to put anything bulky; it would have to be light enough to be mounted on the wall or door.
What I really wanted was an On Air sign, like at radio studios, and Jason’s dabbling in e-ink status displays made me think that I’d finally found the right technology for the job. When Six Colors member Mihir mentioned the Inkplate 6COLOR, I didn’t hesitate in ordering one.
The 6COLOR has a number of things going for it: for one, it’s a complete system, including an e-ink display, controller board, Wi-Fi, and so on. For another, you can pay a little more to have it shipped with a 3D-printed frame—not pretty, but it gets the job done. Finally, though it’s not battery-powered out of the box, an under-$20 Adafruit battery is simple to install.
But that was just the beginning; putting this project together ended up requiring a bit more hands-on time than I’d expected.
The hardware
The Inkplate 6COLOR is, as the name suggests, a color e-ink display. Don’t go in expecting a Super Retina XDR experience, because you’re not going to get it: we’re talking 600-by-448 pixels with seven colors (black, white, red, yellow, blue, green, and orange) at 128 dots per inch. Dithering does let you show most colors, but it’s still not going to provide you with an amazing image.
Fortunately, while color was a nice perk, it wasn’t a requirement for my sign. But the color technology does add one major drawback to the 6COLOR: its refresh time—the amount of time it takes to draw a new image on the e-ink display—is slow. And I mean slow. A sloth could drink molasses out of a sippy cup faster. It takes at least 10 full seconds to draw a new image; sometimes that seems closer to 20. It’s one place where a black-and-white screen actually might have served me better but you live and you learn.

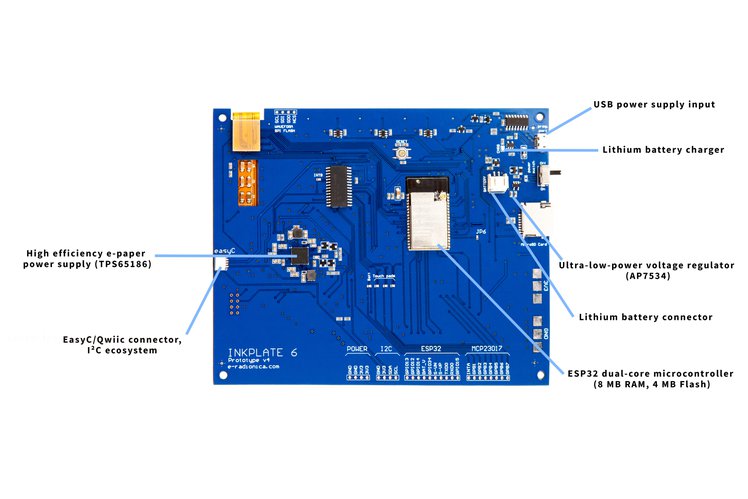
Beyond that, the hardware is fairly basic. There’s a sleep/wake switch, a microSD slot for onboard storage if you need it, and a USB-C connector for power and data. Installing the battery required opening the back up with a small screwdriver1 and then connecting the battery to the correct terminals, using the board schematics. There’s no place to mount the battery really so I just left it loose inside the case and sealed the whole thing back up.2
Satisfied that it was now able to run on its own power—though for how long I wasn’t sure, since there’s no built-in way to check the battery level until it basically dies—I set about for what would end up being the far more challenging part of the project: the software.
The software
The Inkplate 6COLOR’s microprocessor is Arduino-based, though it also supports the MicroPython programming language. While I have more familiarity with Python, it was unclear to me just how many of the built-in features would be easily addressable in MicroPython, so I decided to stick with the default, and downloaded a copy of the Arduino IDE.
It was here that I was forced to dust off some meager 20-plus-year-old programming knowledge. While I’ve spent a lot of time as a PHP web programmer and dabbled in other languages, programming an Arduino relies on C/C++, languages that I only got passing familiarity with while taking a course on Java back in freshman year of college.3
Fortunately, the Inkplate docs include a helpful Get Started guide that includes a ton of built-in examples accessible via the Arduino IDE that you can peruse to figure out how things work.
In thinking about how to architect my program, I had concluded that I would try to just have the On Air sign grab an image from a web server and display it, so I picked the closest example in the library, the Web Pictures project.
I created a couple of basic On Air/Off Air images using Acorn: just solid-colored text on a solid colored background (white on black for Off Air, white on red for On Air4), at the exact resolution of the Inkplate’s display.
Once I’d gotten the hang of how the Arduino IDE worked, subbing in my images for those in the example was easy enough, and the proof of concept was up and running.

At that point, the challenge became how to maximize energy efficiency. In an ideal world, I would have had a ping sent to the Inkplate display telling it when to change images, but that would require it be awake or be woken by the ping, which proved to be a more complex solution that was somewhat beyond my skills.
Instead, I ended up loading the images locally on the device, encoding them into a byte array using Inkplate’s online tool so that they could be bundled into the program itself—fortunately they were small enough to not use up too much of the limited onboard memory. That way I could simply have the Inkplate check a public URL to see if I was on air and load the appropriate image, rather than downloading it every time.
To make it even more efficient, I opted to use the display’s deep sleep feature, which shuts down most of the onboard systems to conserve memory. I had it store the current on air status in the tiny bit of RAM that gets preserved while in sleep, then wake every five minutes to see if the status had changed; if so, it switches the image and, if not, it just goes back to sleep.
The resulting program actually ended up being fairly simple: the meat of it is only about 60 lines of code or so. But in my testing it works pretty darn well.5 I’ve gone ahead and made it available as a GitHub project for any interested parties.
All I needed now was a way to toggle it on and off.
The shortcut
To register my on air status, I’d created a text file on my web server that contained either a 1 if I was on air or a 0 if not. What I needed was a way to toggle that back and forth and I settled on creating a shortcut.
This also ended up providing me my first best opportunity to use Apple’s Focus system, which I use as a local proxy for my on air status.
The shortcut checks to see if my current focus mode is already set to Podcasting and, if so, deactivates the focus mode and then sets my on air status to 0. Otherwise, it turns on the Podcasting focus mode and sets my on air status to 1. Then I use the Run script over SSH action to echo that status variable to the text file on my server.

I can trigger the On Air shortcut via the menu bar or my Stream Deck, but I decided to take it a step further in automating it and use Audio Hijack’s own automation features to trigger the shortcut every time I start or end a recording session.
Apple’s Shortcuts implementation on the Mac unfortunately does not offer automation features, meaning I can’t automatically have a shortcut launched when the feature is activated or deactivated, as I can on the iPhone.6
If you’d like a copy of the shortcut, you can download it here.
The result
With the code working and my shortcut hooked up, I took the last step and attached the on air sign to my office door using some 3M Command Strips, allowing me to easily remove it when I need to charge it.
The battery life has been truly impressive: even checking as frequently as it does, the Inkplate goes several days without needing to recharge.
Yes, I do wish that there weren’t potentially a five-minute lag time between going on air and the sign updating; it would be nice to be able to ping the e-ink display directly to have it update, removing the remote server from the equation entirely.
But all that really means is that I’ve left myself some work for an eventual version 2.0.
- My trusty old iFixit driver kit to the rescue. ↩
- Was that a good idea? Who knows! If not, I guess we’ll find out eventually. 😅 ↩
- Hey, Java was the hot new thing in 1998! ↩
- I started with red on black for the On Air image, but Mihir rightly pointed out that white on red is much easier to distinguish at a glance. ↩
- If there’s a problem with it, it’s that I occasionally see the board balk at re-connecting to Wi-Fi after waking from sleep, but it seems to happen inconsistently and may be more of an issue of the Wi-Fi network strength than anything. ↩
- I could, of course, set the automation to run on the iPhone instead, since my Focus modes are mirrored on my devices, and I may do so eventually, but I haven’t yet decided if that makes sense. ↩
[Dan Moren is the East Coast Bureau Chief of Six Colors, as well as an author, podcaster, and two-time Jeopardy! champion. You can find him on Mastodon at @dmoren@zeppelin.flights or reach him by email at dan@sixcolors.com. His next novel, the sci-fi adventure Eternity's Tomb, will be released in November 2026.]
If you appreciate articles like this one, support us by becoming a Six Colors subscriber. Subscribers get access to an exclusive podcast, members-only stories, and a special community.