

By Dan Moren
October 29, 2020 8:51 AM PT
Adventures in Streaming: Bringing iOS into the mix
Note: This story has not been updated since 2020.
Wayyyyy back in March, when this whole global pandemic thing was just getting started, I wrote a piece about streaming games with friends and the tools I used to make it happen.
Well, in the ensuing seven months, I’ve spent a lot of time refining my streaming setup, tweaks here and there, different types of content, adding some additional capabilities to the mix, and so on. I wanted to add a couple of salient updates to my previous post, in particular from a recent experience streaming the game Among Us, which is available on Steam for PCs, as well as Android and iOS.

In order to play the game, I chose to play on iOS, for somewhat obvious reasons—namely, it’s the only compatible platform I have. I thought this might present a difficulty with my streaming setup, given that I’m not streaming something that’s on my Mac, which is usually the case for me.
What I discovered, however, is that there are a couple options to do this, though the most elegant of solutions…doesn’t really work. Let’s dive in.
Just a bunch of SLOBS
Since my last post, there’s been a new challenger for Mac streaming software: Streamlabs OBS. This popular free app has been available on Windows for some time, but only recently came to the Mac with a beta earlier this year. Since then, it’s been updated a few times, though I still run into occasional stability issues, including spontaneous crashes and slow performance.1

However, Streamlabs OBS has a big benefit over the software I was previously using, Telestream’s Wirecast, by virtue of being free. That’s largely because it’s basically built on top of the open-source OBS streaming software (also available for the Mac, as well as other platforms).
While OBS is a general-purpose streaming tool, Streamlabs OBS (or SLOBS, as it is affectionately(?) known) is clearly aimed at a game-streaming crowd. I tend to ignore most of the bells and whistles, but I appreciate its slightly nicer interface than vanilla OBS, and the fact that it lets me store my scenes in the cloud, making it easier to share them with people who might stream on the same account. (That said, the below instructions work just fine in standard OBS as well, and I’ve recreated several of my streaming setups there. They’re largely interchangeable, though personally, I find that both of them lack features I would very much like, such as easier alignment of objects on the canvas.)
Need input
So, to grab video from an iOS device, I figured out that you can connect your device using a Lightning to USB cable, and then simply choose it as a Video Input in OBS. Choose your resolution, and bam, done. Really, couldn’t be easier.
Except, hold on a second: this is only the video from the iPad, not the audio. You might think that you could simply add a commensurate Audio Input and, voilà, problem solved, but alas no. By default, the Mac doesn’t see your connected iOS device as an audio input.
But, it turns out that this is something you can enable, if you fire up macOS’s built-in Audio MIDI Setup utility. Scroll down the list of audio devices, and you’ll see your connected iOS device at the bottom, with a button marked “Enable.” Click that, and your iOS device will appear as an audio input! Problem solved, right?

You probably guessed that it isn’t. The issue seems to be that this system is truly modal: when you enable audio input, it disables the video input. Only one can be active at a time. Which is a little bizarre, given that, in theory, the Lightning port can clearly output both audio and video simultaneously, such as when you’re using Apple’s Lightning Digital AV Adapter.
So, I could either output the video of the game to my stream, or the audio. Given the choice, I’d would have chosen the video, since much of the audio will be superseded by the conversation of the participants. But I still wasn’t satisfied: I wanted both.
When the OS closes a door, open a window
What I ended up doing was falling back to my original idea for capturing content from iOS. One handy feature on macOS is that the QuickTime Player app lets you record the screen of an iOS device connected via Lightning, essentially treating it as a camera. With your device connected, simply launch QuickTime Player and choose New Movie Recording.
Then use the drop down arrows next to the Record button to set both your camera and your microphone to your iOS device. Now you have video and audio from your iOS device coming through your Mac. (You may need to adjust the volume settings in QuickTime Player or on your device in order to get them to the right level.)
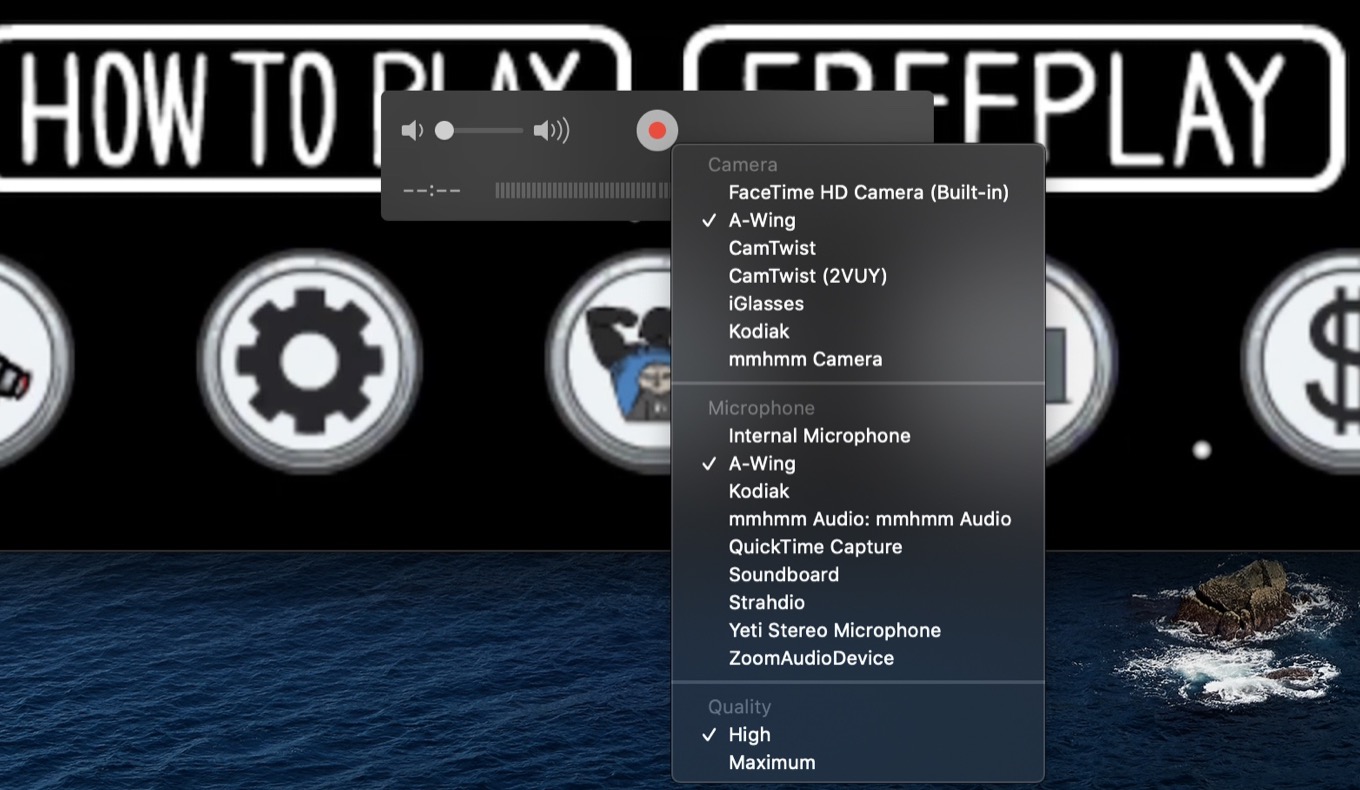
That gets both video and audio in, but getting them to the stream requires a few extra steps. The good news is that the video is easily captured using the trusty old Window Capture option in Streamlabs OBS and selecting the QuickTime Player window; essentially you’re just screen recording it. (Just make sure to tuck the QuickTime window behind the Streamlabs OBS window so you don’t accidentally mouseover the video and have the playback controls show up in your stream. You can’t, unfortunately, hide the window, because the system then can’t seen the window to capture.)
Audio is a little trickier, but now that it’s actually coming out of an app on your Mac, I could turn to my standby tools to grab the audio from QuickTime Player. I used Rogue Amoeba’s Loopback (yes, it’s pricey, but it’s easy to use and gets the job done) to create a virtual device that captures the audio from QuickTime Player, then I add a Audio Output device to Streamlabs and select that new output.
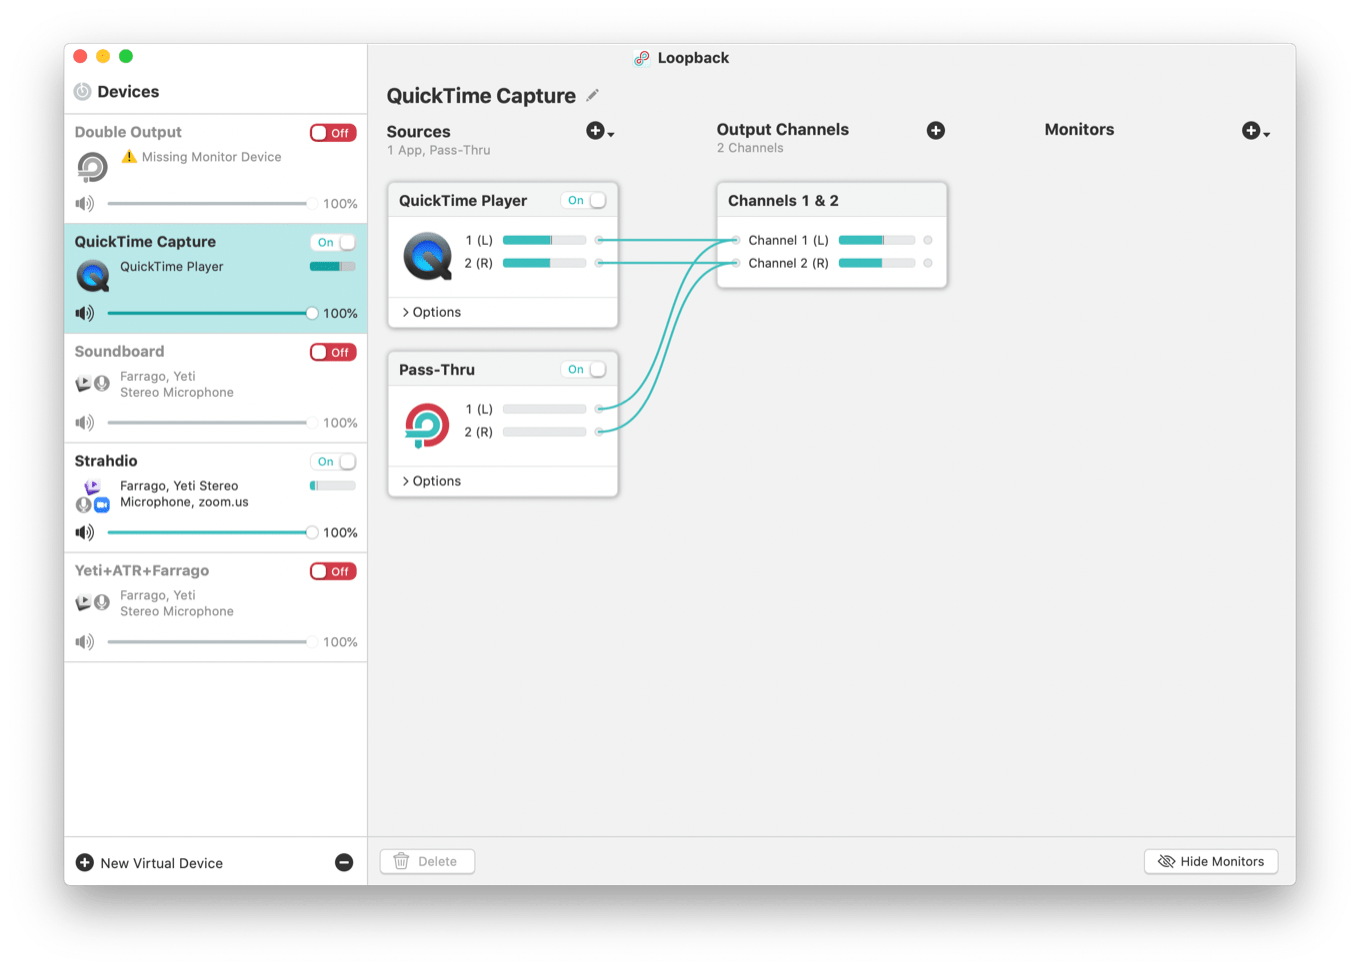
I could mix the audio from QuickTime Player along with my microphone and the people with whom I’m playing over Zoom to create a single audio output, but having QuickTime Player broken out separately lets me adjust the volume for the game independently in the streaming app, giving me more control over the whole mix.
And finally I had my capture and streaming setup the way I wanted it.

Elegance in its sheer simplicity (almost)
But I can’t help but feeling like my solution is kind of a kludge. This setup could be so much more elegant, if Apple took the time to address the issue of not being able to capture audio and video at the same time (unless you’re QuickTime Player, apparently).
Using window capture works, but it comes with its share of quirks, such as the mouseover problem I mentioned above, or the fact that resizing the window automatically resizes it in the streaming app (because it’s literally capturing the window, instead of just taking a video feed at a specified resolution). And, of course, audio capture requires an expensive piece of software—no offense to the folks at Rogue Amoeba, who have been making this easy for so long—but this seems like a case where all the pieces are there, but Apple just has to make some adjustments.
I would be remiss if I didn’t mention that there is actually streaming support built into iOS itself. However, iOS’s limitations in multitasking and audio routing mean that you can’t really do beyond streaming whatever app you’re running and your microphone.2 For the kind of setup I’m doing, chatting with multiple players and mixing that audio in with a game, it’s basically a non-starter.
Streaming is getting more and more popular—and with the pandemic in the mix, even more people are turning to it for their own entertainment or to entertain others. It would be great to see Apple lower the barrier to entry for those who’d love to give it a try.
- For reference, I’m using a 2017 5K Retina iMac, with 32GB of RAM, a 4.2GHz Quad-Core i7, and a Radeon Pro 580 8GB graphics card. Not top of the line, but not too shabby. ↩
- Which means if you want quality any better than what your iOS device’s built-in mic offers, you have to find an external mic that’s compatible with your device. ↩
[Dan Moren is the East Coast Bureau Chief of Six Colors, as well as an author, podcaster, and two-time Jeopardy! champion. You can find him on Mastodon at @dmoren@zeppelin.flights or reach him by email at dan@sixcolors.com. His next novel, the sci-fi adventure Eternity's Tomb, will be released in November 2026.]
If you appreciate articles like this one, support us by becoming a Six Colors subscriber. Subscribers get access to an exclusive podcast, members-only stories, and a special community.