

By Jason Snell
February 2, 2015 7:18 AM PT
Last updated May 31, 2023
How I podcast: Editing
Note: This story has not been updated since 2023.

Once you’ve recorded your podcast, it’s time to edit. Editing can be incredibly simple—trim the beginning and end point and be done with it—or as complicated as you want to make it. I use a few different editing approaches based on my tools and the needs of the particular shows I do. Let me describe them to you now…
To edit, or not?
The first question worth asking yourself is, do you need to edit your show at all? If all you ever intend to do is trim the beginning and end of the show, and maybe clip out that part in the middle where you go and get yourself a soda1, you probably don’t need an editing tool more complicated than the free Audacity or some other wave-form editor like Sound Studio or Fission. Snip out the stuff you don’t want, maybe paste in some music, and call it a day.
Not to get all philosophical on you, but editing audio is a lot of work, and depending on what kind of a podcast you’re producing, most of it is probably not necessary. Just because you can edit a podcast within an inch of its life—clearing out pauses, removing every um and uh and awkward pause and spoken digression—doesn’t mean you must.
People speak with pauses and ums, with tangents and elliptical phraseology. Our brains are really, really good at taking all of that input and smoothing it out into something understandable. You could even argue that with too much editing, speaking starts to sound artificial and alien, because it no longer sounds like what we hear coming out of people’s mouths every day.
I’ve given up on trying to edit out the ums and uhs of regular speech, for the most part. Yes, if someone lets out a long “ummmmm….” followed by three seconds of silence, I’ll trim it. But I’m not willing to spend hours ironing out the speech patterns of a normal human being so they sound like they emanated from a robotic voice reading from a script.
I’m not saying that other podcasts or radio shows sound like robotic emanations. There is a spectrum of audio intervention, starting at completely unedited and ending with an uber-processed editing extravaganza. The more you intervene, the more time you spend editing, until at the far end of the chart you’re editing forever. Every editor has to make a decision about how far to go down that path, and what the trade-offs are between ironing out diction and never posting an episode because you’ve put in 20 hours of editing time and are only 20 minutes into your special two-hour episode.
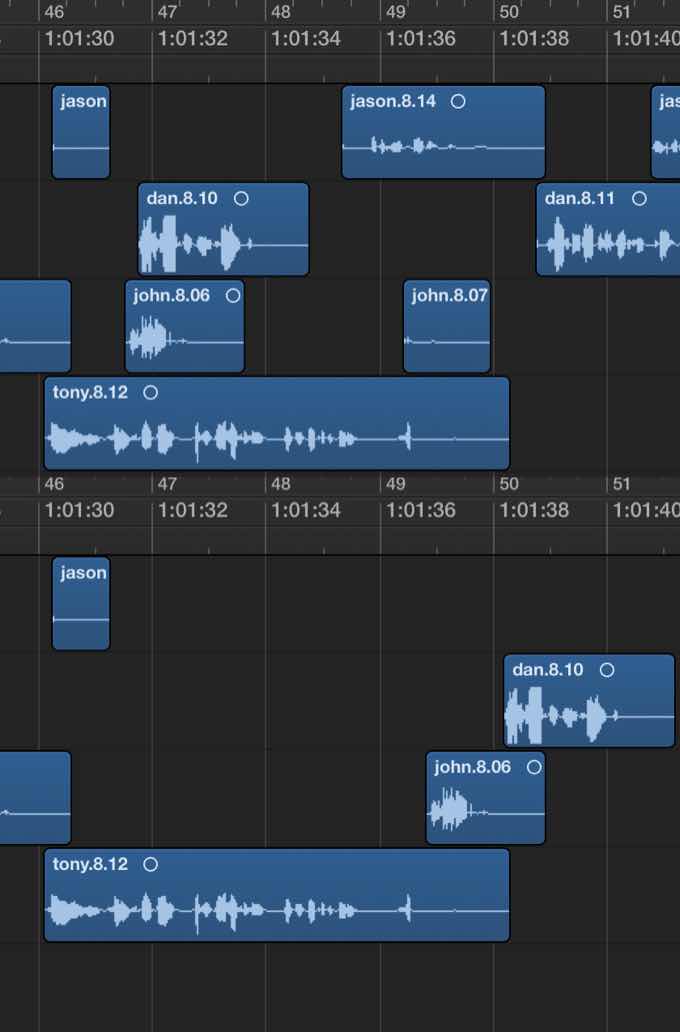
As I described in my post about recording, most of my podcasts feature at least two audio tracks, one featuring my voice and one or more featuring the people I’m talking to. Once you start editing multiple tracks at once, it’s time to leave the realm of the simple audio editing app behind and move into a more complicated, multi-track editor, sometimes called a Digital Audio Workstation.

The good news is, every Mac user has access to a free multi-track editor: GarageBand. Yes, other than a brief dalliance with podcasting in 2006, GarageBand has always been a tool geared toward music. But that doesn’t mean you can’t edit podcasts in GarageBand—in fact, GarageBand was my multi-track editor for the first two years of The Incomparable. If you’re a Mac user and haven’t used a multi-track editor before, start with GarageBand2.
Basic editing with multiple tracks
A step-by-step guide to using GarageBand for podcasting is beyond the scope of this article. But here’s basically how I approached it. In a new GarageBand project, I’d add tracks for each of my audio files and drag them in.
Lining up vocal tracks so they’re in sync—in other words, so that when you hear one person ask a question, you then hear the other person give the answer—can be tricky. If you’re recording a conversation using built-in recording software on your VOIP app or service of choice, they’ll probably line up perfectly. But if you’re asking everyone in your recording session to record their own end—my preferred method, because it ensures the highest quality recording and avoids dropouts—you’ll need to find a way to sync them all together.
Here’s my approach to syncing: I drag my voice track and the track containing the audio of the entire conversation into my multi-track editor. Since I generally record both tracks simultaneously on my Mac using Audio Hijack, they’re in perfect sync—-so I drag them both to the left, to the very start of my timeline, thereby making sure they’re aligned.
If you don’t want to use the multi-ender approach to podcast editing, you’re done—you’ve got your own voice on one track and everyone else on the other track. I have definitely produced lots of podcasts using this method, and it works fine. A remote recording will never sound as good as a local one, but if your connection is stable, it’s fine.
The advantage of placing voices on their own tracks is twofold: First, you can apply different effects to each track3, so if your local microphone is quieter than the remote track, you can balance that out. You can also turn on filters such as a noise gate, which suppresses quieter noises heard in the background when you’re not talking.
Second, having separate tracks means you can edit the contents of one track without affecting the contents of the other track. It’s like having layers in Photoshop. Let’s say my co-host answers one of my questions, and it sounds like they’re done answering—so I start to jump in to ask another question. But it turns out they was just pausing to think, and then continues answering for another minute. These sorts of interruptions and false starts happen all the time in normal conversation, but way more often when you can’t see the other person, like on a voice-only internet call.

In any event, since my voice is on a separate track, I can remove my false start without affecting anything my co-host says. In GarageBand, you’d move the play head to just before the false start, select the track containing my voice, and type Command-T (Edit: Split Regions at Playhead). Then move the play head to just after my false start, select the track, and type Command-T again. This creates an isolated region of my track that contains my false start, which I can click on to select and then delete by pressing the Delete key.
That’s a tiny example, but this approach is the most fundamental thing to understand about editing a multi-track podcast: Once everyone’s on their own track, you can individually adjust everything about each track, including both effects and content.
Dropping in music, like a theme song, is also easy in GarageBand. You can drag in a file or click on the Apple Loops icon to select from a bunch of stock music Apple provides with GarageBand. Be sure to add it to a new track, so it doesn’t lay on top of your vocal tracks.
Once you’re satisfied with what you’ve got in GarageBand, export your file by using the Share: Export Song to Disk command. You can use one of Apple’s built-in MP3 presets, or do what I do—save out an AIFF, drag it into iTunes, and use iTunes’s own Import Settings (located in the General tab of iTunes Preferences) to pick. Most of my podcasts are exported as 64kbps mono MP3s4.
Logic, stripping silence, and overtalking
The reason I switched from GarageBand to Logic has more to do with speed than functionality. Pro apps like Logic and Adobe Audition offer hundreds of features I’d never use, but also a few features that allow me to edit a podcast in a fraction of the time it used to take.
As I wrote back in 2013, the key Logic features that have made my life easier involve track selection, region deletion, and silence detection. As I step through how I edit podcasts today, I’ll highlight each of these features in turn.
As with GarageBand, I start in Logic by dragging in individual tracks sent to me by my panelists. I use the recording of my whole call as a reference, and align all the other audio tracks to match it5. One I’ve got all the tracks aligned, I find the beginning and end of the podcast and lop off the extra bits.
Then I use a Logic feature called Remove Silence, which takes a selected item—at this point a single block of one person’s conversation for an entire hour or two—and removes all the silent bits, leaving behind dozens or hundreds of smaller blocks. Having described this technique to other people, I’m starting to get the impression that most people don’t edit this way.

But using Remove Silence works for me because when I edit a podcast, my top priority6 is in eliminating as many instances as possible of two people talking at the same time. Call them interruptions, collisions, or overtalking, but they’re not good podcasting—and the more participants in one conversation, the more often they’ll occur. So many of my shows feature four or five different guests, that they’d be unlistenable without some serious clean-up.
Using the Remove Silence feature gives me a set of blocks indicating where there’s sound. Some of the time, this is stray noise—coughs and microphone bumps and the like—and I delete that stuff immediately, when I might have missed it otherwise. Most of the time, though, it’s talking. Now when I edit a podcast episode, I can ignore the portions of the show where someone’s monologuing, and focus on my top priority—smoothing out the intersections in conversation where many people are trying to talk at once.
There are a few ways to smooth out those segments. If someone is trying to get a word in, but failing, you can generally just remove them and nobody’s the wiser. If two separate thoughts are expressed simultaneously, or one person starts talking just as another is finishing up, I will often keep both segments, but pull them apart in time so that they appear sequentially rather than simultaneously.
This is where Logic’s track selection and region deletion come in handy. With one keyboard shortcut, I can select every audio block that’s forward of the item I’ve currently selected. This makes it easy to grab everything and move it forward or back, allowing me to shift bits of the conversation around until they flow without interruptions.
Sometimes a block will contain good audio as well as bad. For instance, imagine that someone who was initially interrupted continued to talk and soldiered on through the interruption. I can remove the interruption, but that might leave them still saying something like: “Um, oh! I was going to say, I liked this because…” I want to delete the stumble and the apologetic “I was going to say”7. For cases like these, I like to wield Logic’s big knife, holding down the command key and dragging my cursor to select the portion of the block I want to delete. Then I just press the Delete key, and that chunk vanishes forever.
Putting it together
This is the method that I use to edit most of my podcasts. I start at the beginning and play through to the end, skipping the monologues but playing back anything that features audio from two different tracks at the same time. If it’s just stray noise, I delete it. If there are interjections, I decide if they help or hinder conversation. (I tend to leave in laughter, but remove most reflexive agreement—it turns out that some people have a very agreeable conversation style and interject “yes” and “uh-huh” every 30 seconds to let you know they’re still engaged, while other people stay resolutely silent. Things you learn when you edit hundreds of hours of podcasts…)
When I get to a collision of voices, I get to work deleting the false starts, pulling apart the overtalking, and smoothing the interruptions. Once someone takes over the conversation and monologues for a while, I’m back in cruise mode until the next sign of trouble. Every now and then I’ll find a segment of the conversation that seems off topic and clip it out, pasting it at the very end of my file if I think I might want to save it as bonus material. And so the edit progresses, from 0:00:00 to the very end of the show, at which point I’ll lay in theme music and drop in any advertising spots and the like.
In order to illustrate this process, I’ve captured a time-lapse video of me editing a recent episode of The Incomparable. Feel free to use YouTube’s speed features to slow it down if you’re curious about something in particular; as you watch you’ll see the stately progression of the edit from left to right, from start to finish, as I try to spot noises and peel apart interruptions until I reach the end of the show.
Since I originally wrote this article, I’ve also started editing podcasts using Ferrite Recording Studio on the iPad. I use the same techniques in that app, and also made a video showing it in action.
Editing isn’t mandatory. As you start editing podcasts, you’ll realize that some kinds of content demand more editing, and others less. My editing challenge with The Incomparable is large, because of the large panels. With Total Party Kill, it’s generally less, but it’s still a large group and when three people all say something funny at once, you want to find a way to make sure all three jokes get their moment in the sun. Clockwise‘s format means it has very little give and take, which means interruptions are at a minimum, but its 30-minute maximum can force some very tough editing decisions. And many other podcasts are simple conversations that gets the lightest of touches.
As for your podcast, I’m confident that you’ll figure out what works for you as you go. Your show will teach you what it needs as you work on it.
- My friend Myke Hurley has a pad of paper and a pen next to him when he’s recording, and writes down the time when there’s anything that needs to get snipped out in editing, which saves a lot of time, since he can jump right to those points. ↩
- Anze Tomic reports that if you are a Windows user, you should check out Reaper. ↩
- Pro tip: Make sure your GarageBand vocal tracks’ effects are set to the No Effects present or one of the legacy Podcasting presets, and not anything under the Vocals submenu. Those add echoes and other effects that sound great on sung vocals, but not spoken-word stuff like podcasts. ↩
- This, counterintuitively, requires you to set iTunes to convert MP3s at 128kbps—that rate is assumed to be the rate for a two-channel stereo file, so the resulting mono file will have a bit rate of 64kbps. ↩
- Actual pro tip: Your participants are more likely to stop recording in unison (at the end of the podcast/call) than they are to start recording in unison, so start by aligning the end of everyone’s audio tracks before diving into the finer work of getting the sounds to match up. Or be smart and have everyone count down “3-2-1” and clap their hands together just before you start the show. ↩
- My second priority is the actual flow of the show, removing tangents that slow the conversation down or make it swerve off topic. For Clockwise, which has a strict time limit, this was the most important priority: If our recording session ran 34 minutes, I had to cut four full minutes out. It’s an interesting challenge. ↩
- Sure, podcasters should try to train as many ums and uhs out of their voices as possible. But as an editor, I beseech you: beat down the reflexive “I was gonna say.” Just pretend the interruption never happened, and your editor will do the rest. ↩
If you appreciate articles like this one, support us by becoming a Six Colors subscriber. Subscribers get access to an exclusive podcast, members-only stories, and a special community.